孤儿院捐赠物资管理系统
# 孤儿院捐赠物资管理系统
大家好,我是程序员小孟,今天给大家更新一个SpringBoot3+Vue3捐赠系统,可以做捐赠系统、捐物等等。可以学习或者二次开发。
更新不易,记得Star!Star即为朋友,非常感谢!
# 01、项目功能演示
# 项目背景
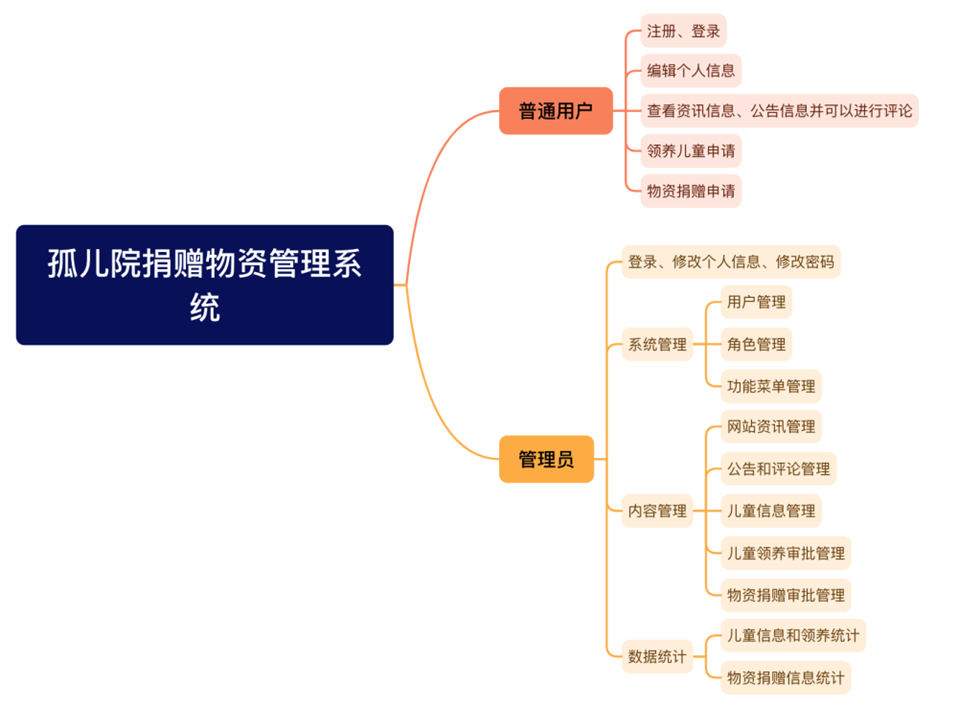
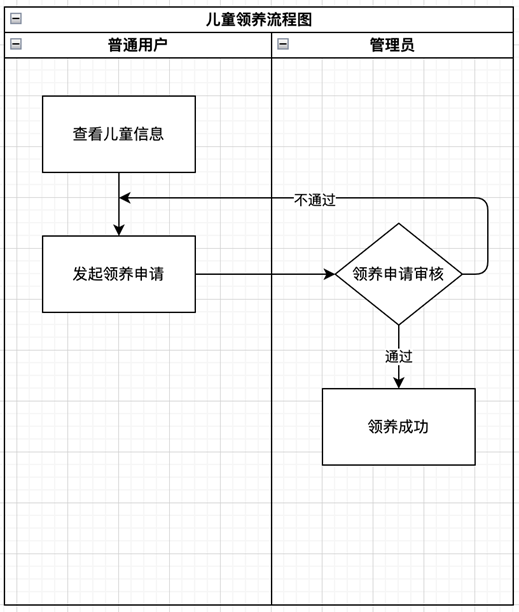
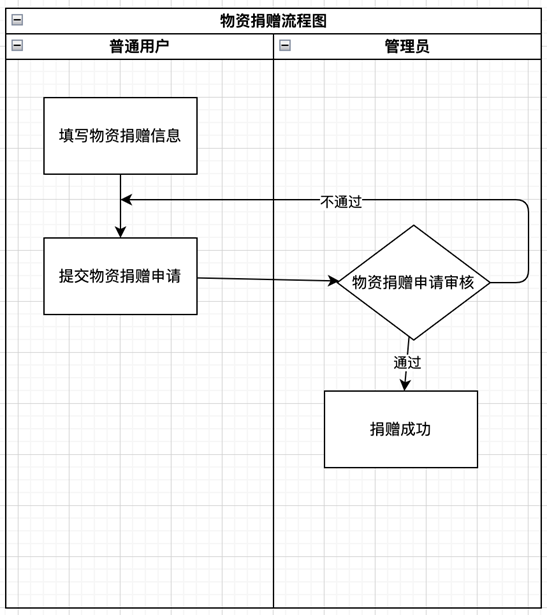
该项目主要用于孤儿院等一些儿童福利机构,用于发布一些公告、资讯和孤儿信息,用户注册登录以后可以查看孤儿信息,进行领养申请,管理员通过审核以后可以进行领养;用户也可以通过该系统平台进行物资捐赠等。
项目的演示在b站:
https://www.bilibili.com/video/BV1y8m8YDEhQ/?spm_id_from=333.1387.homepage.video_card.click&vd_source=e64f225fc5daf048d2687502cb23bb3b
详细教程在公众号文章 https://mp.weixin.qq.com/s/hOEaxMuQdqFjss2YIkJ7Nw?token=1934373140&lang=zh_CN

# 技术架构
前后端分离后端:SpringBoot + MyBatis + Hutool。前端:Vue3 + Element-Plus + TypeScript + Axios + ECharts数据库: MySQL
# 主要功能
# 管理员:
登录、个人信息、修改密码
用户管理、角色管理、功能菜单管理
网站资讯、公告和留言管理
儿童信息管理
儿童领养审批管理
物资捐赠审批管理
数据统计
# 注册用户
注册、登录、个人信息、修改密码
查看资讯信息、公告信息并可以进行评论
领养儿童,需要管理员审核后才可正式领养
物资捐赠,需要管理员审核后才可捐赠
# 02、孤儿院捐赠物资系统功能需求
# 儿童认领流程
# 物资捐赠流程
# 03、项目部署运行
当前项目技术架构是前后端分离架构的设计,所以项目部署运行也需要分别部署运行前端和后端项目。
# 部署后端项目
环境准备:
数据库环境:mysql5.7+、Navicat客户端工具
Java环境:JDK1.8+、maven3.8+
IDE工具:idea
项目部署:
创建数据库donate-admin,导入数据库脚本
使用idea导入后端项目,配置maven目录,构建项目
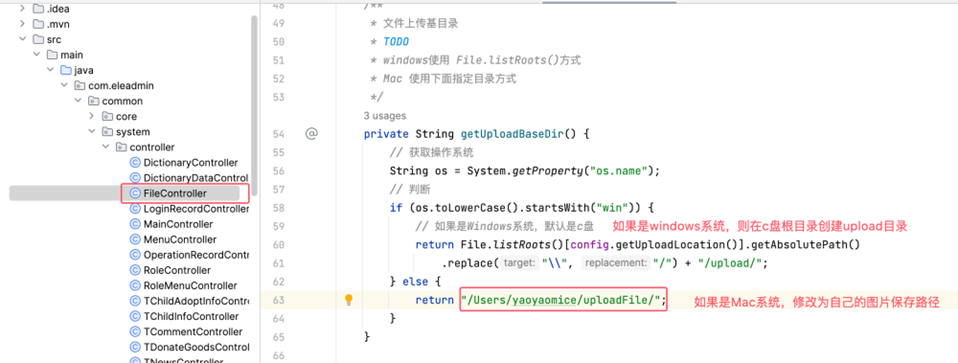
修改数据库账户配置和文件上传路径


- 运行启动类,启动后端项目
# 部署前端项目
环境准备:
安装node.js v20.18.0版本: https://nodejs.org/dist/latest-v20.x/ (opens new window)

IDE工具:vscode, hbuider, webstorm均可
部署前端项目:
在终端输入npm install, 安装项目的依赖包
在终端输入npm run dev 启动项目
输入 http://localhost:3000 访问项目
# 04、后端项目框架结构讲解
后端项目是基于SpringBoot进行构建的,对于SpringBoot的项目,项目结构基本都是固定的,下面是物资捐赠系统的后端项目结构。

项目开发的编码顺序:
构建SpringBoot项目,导入idea
在pom.xml中引入项目依赖,比如mybatis, mysql等
编写实体类entity
编写数据访问接口mapper
编写业务类接口和实现类:service
编写控制器/API接口类:
使用postman进行api接口测试 / 前后端联调
注意:实际开发的时候,一般都不会从零开始构建项目,一般都会基于一些脚手架工具或者快速开发平台,这样项目中一些公共的功能都已具备,比如全局异常处理、文件上传/下载、登录鉴权等。
# 05、前端项目框架结构讲解
物资捐赠系统的前端是基于Vue3.x和TypeScript进行开发的,项目打包工具用的vite,下面是前端项目的目录结构。
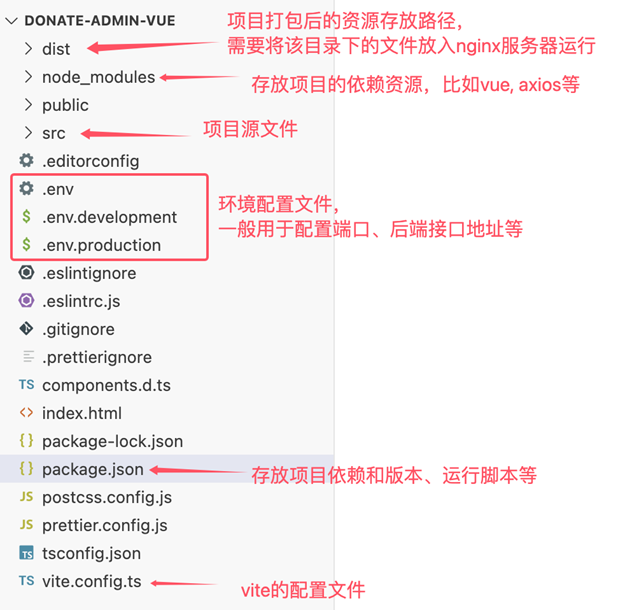
下图是src的目录结构介绍:
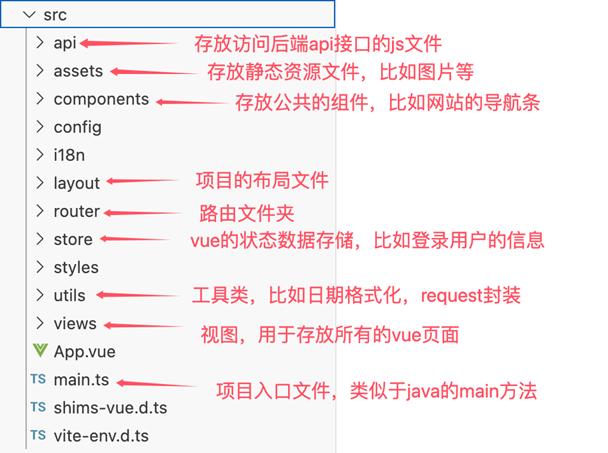
前端代码的编码顺序:
编写视图页面:views
配置路由:router
编写api接口,用于统一访问后端的api接口
在视图中调用api接口,获取数据并渲染
注意:在实际开发中,前端项目也是基于脚手架工具进行构建的,比如elementui, ele-admin等,脚手架工具中一般都提供了很多封装好的组件供使用,非常方便。
# 06、项目数据库表讲解
物资捐赠系统共设计了15张表用于存储基础数据和业务数据。

# 07、儿童信息管理--后端代码编写
接下来我们开始从零搭建一个SpringBoot项目,以儿童信息为例,看看后端api接口是如何搭建并进行访问测试的。(注意:这次演示并未使用脚手架项目)。
基于的数据表:t_child_info

编码开发步骤:
创建springBoot项目,基于SpringBoot3
按需添加不同的项目依赖
编写配置文件:配置数据源、服务端口、以及框架整合
编写entity --> mapper --> service --> controller
使用postMan进行接口测试
# 08、儿童信息管理--前端代码编写
由于前端项目是一个管理类系统,一个管理类系统一般都有登录鉴权、角色管理、菜单管理、用户管理等功能,所以这次前端代码编写咱们基于已有的脚手架项目进行开发。
下图是脚手架项目启动运行后的效果。
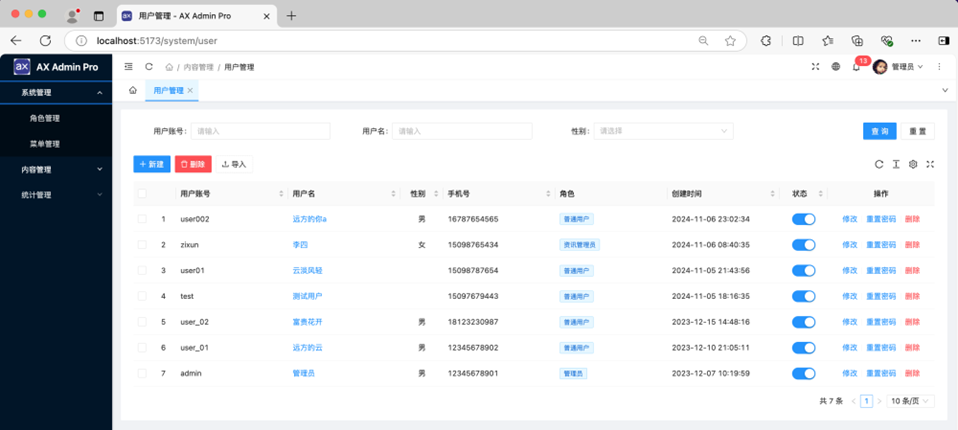
下面我们来基于这个脚手架项目开发儿童信息管理的前台代码。
# 1. 添加一个页面
① 在src/views/system下新建一个文件夹childinfo, 然后新建一个index.vue
<template>
    <div class="ele-body">
        <a-card :bordered="false">
            <div>这是儿童管理页面</div>
        </a-card>
    </div>
</template>
<script lang="ts" setup>
</script>
<script lang="ts">
    export default {
        name: 'SystemChildInfo'
    };
</script>
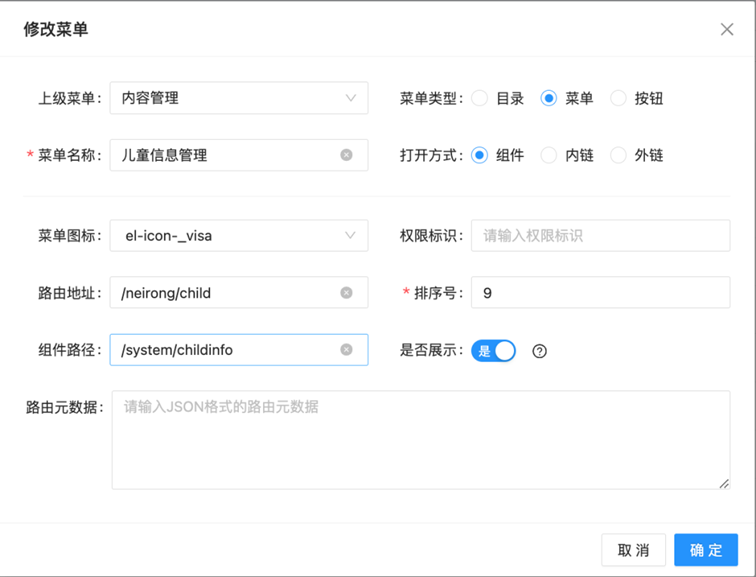
② 在后端项目中添加对应的菜单,配置路由路径和组件路径
# 2. 实现儿童信息的数据查询功能
① 定义儿童信息模型:在src/api/system下新建目录childinfo/model; 添加一个index.ts;
import type { PageParam } from '@/api';

/**
 *定义儿童模型
 */
export interface Child {
  id?: number;
  name?: string;
  sex?: string;
  image?: string;
  age?: number;
  temperament?: string;
  hobby?: string;
  publicDate?: string;
  description?: string;
  createTime?: string;
  createUser?: string;
  isAdopt?: number;
}

/**
 * 搜索条件
 */
export interface ChildParam extends PageParam {
  name?: string;
}
③ 编写页面代码,使用表格来渲染数据
import request from '@/utils/request';
import type { ApiResult, PageResult } from '@/api';
import type { Child, ChildParam } from './model';

/**
 * 分页查询
 */
export async function pageChilds(params: ChildParam) {
  const res = await request.get<ApiResult<PageResult<Child>>>(
    '/system/child/page',
    { params }
  );
  if (res.data.code === 0) {
    return res.data.data;
  }
  return Promise.reject(new Error(res.data.message));
}

③ 编写页面代码,使用表格来渲染数据
<template>
    <div class="ele-body">
        <a-card :bordered="false">
            <ele-pro-table
                ref="tableRef"
                row-key="id"
                :columns="columns"
                :datasource="datasource"
                :scroll="{ x: 800 }"
            ></ele-pro-table>
        </a-card>
    </div>
</template>
<script lang="ts" setup>
import { createVNode, ref } from 'vue';
import type { EleProTable } from 'ele-admin-pro/es';
import type {ChildInfo} from '@/api/system/childinfo/model'
import type {
    DatasourceFunction,
    ColumnItem
  } from 'ele-admin-pro/es/ele-pro-table/types';
import {pageChildInfos} from '@/api/system/childinfo'
  // 表格实例
  const tableRef = ref<InstanceType<typeof EleProTable> | null>(null);
    // 表格列配置
  const columns = ref<ColumnItem[]>([
    {
      key: 'index',
      width: 48,
      align: 'center',
      fixed: 'left',
      hideInSetting: true,
      customRender: ({ index }) => index + (tableRef.value?.tableIndex ?? 0)
    },
    {
      title: '姓名',
      dataIndex: 'name',
      sorter: true,
      showSorterTooltip: false
    },
    {
      title: '性别',
      dataIndex: 'sex',
      sorter: true,
      showSorterTooltip: false
    },
    {
      title: '爱好',
      dataIndex: 'hobby',
      sorter: true,
      showSorterTooltip: false
    },
    {
      title: '操作',
      key: 'action',
      width: 200,
      align: 'center'
    }
  ]);

  // 表格数据源
  const datasource: DatasourceFunction = ({ page, limit, where, orders }) => {
    console.log(page,limit,where,orders)
    return pageChildInfos({ ...where, ...orders, page, limit });
  };
</script>
④ 添加查询条件:添加一个查询条件的组件 --> 引入组件 --> 绑定查询事件
查询条件组件定义:在childinfo中创建components/child-search.vue
<!-- 搜索表单 -->
<template>
    <a-form
      :label-col="{ md: { span: 6 }, sm: { span: 24 } }"
      :wrapper-col="{ md: { span: 18 }, sm: { span: 24 } }"
    >
      <a-row>
        <a-col :lg="6" :md="12" :sm="24" :xs="24">
          <a-form-item label="儿童名称">
            <a-input
              v-model:value.trim="where.name"
              placeholder="请输入儿童名称"
              allow-clear
            />
          </a-form-item>
        </a-col>
        <a-col :lg="6" :md="12" :sm="24" :xs="24">
          <a-form-item label="性别">
            <a-select v-model:value="where.sex" placeholder="请选择" allow-clear>
              <a-select-option value="1">男</a-select-option>
              <a-select-option value="2">女</a-select-option>
            </a-select>
          </a-form-item>
        </a-col>
        <a-col :lg="6" :md="12" :sm="24" :xs="24">
          <a-form-item class="ele-text-right" :wrapper-col="{ span: 24 }">
            <a-space>
              <a-button type="primary" @click="search">查询</a-button>
              <a-button @click="reset">重置</a-button>
            </a-space>
          </a-form-item>
        </a-col>
      </a-row>
    </a-form>
  </template>

  <script lang="ts" setup>
    import useSearch from '@/utils/use-search';
    import type { ChildInfoParam } from '@/api/system/childinfo/model';

    const emit = defineEmits<{
      (e: 'search', where?: ChildInfoParam): void;
    }>();

    // 表单数据
    const { where, resetFields } = useSearch<ChildInfoParam>({
      name: ''
    });

    /** 搜索 */
    const search = () => {
      emit('search', where);
    };

    /** 重置 */
    const reset = () => {
      resetFields();
      search();
    };
  </script>
导入查询组件,并绑定search事件
<ChildSearch @search="reload"></ChildSearch>
<script lang="ts" setup>
  import ChildSearch from './components/child-search.vue'

  /* 搜索 */
  const reload = (where?: ChildInfoParam) => {
    tableRef?.value?.reload({ page: 1, where });
  };
</script>
# 3. 实现儿童信息删除功能
① 给表格添加一列操作列,实现删除功能。在 columns 中添加操作列,并通过 bodyCell 插槽 添加自定义列:
<ele-pro-table
      ref="tableRef"
      row-key="id"
      :columns="columns"
      :datasource="datasource"
      :scroll="{ x: 800 }"
  >
  <template #bodyCell="{ column, record }">
                <template v-if="column.key === 'action'">
                    <a-space>
                      <a-popconfirm title="确定要删除此用户吗?" @confirm="remove(record)">
                        <a class="ele-text-danger">删除</a>
                      </a-popconfirm>
                    </a-space>
                </template>
            </template>
</ele-pro-table>
<script lang="ts" setup>
  const columns = ref<ColumnItem[]>([
    {
      title: '操作',
      key: 'action',
      width: 200,
      align: 'center'
    }
  ]);
</script>
② 定义删除处理的方法remove, 需要child的api接口类中添加一个removeChild方法
/**
 * child.ts 中的删除方法
 * 删除
 */
export async function removeChild(id?: number) {
  const res = await request.delete<ApiResult<unknown>>('/system/child/' + id);
  if (res.data.code === 0) {
    return res.data.message;
  }
  return Promise.reject(new Error(res.data.message));
}

/* 删除单个 */
const remove = (row: ChildInfo) => {
  const hide = message.loading('请求中..', 0);
  removeChild(row.id)
    .then((msg) => {
      hide();
      message.success(msg);
      reload();
    })
    .catch((e) => {
      hide();
      message.error(e.message);
    });
};
# 4. 实现儿童信息的新增和修改功能
① 通过插槽 toolbar 在表头增加添加按钮,在删除按钮的旁边增加修改按钮
<template #toolbar>
    <a-space>
        <a-button type="primary" @click="openEdit()">
            <span>新建</span>
      </a-button>
    </a-space>
</template>
<template #bodyCell="{ column, record }">
    <template v-if="column.key === 'action'">
        <a-space>
          <a @click="openEdit(record)">修改</a>
          <a-divider type="vertical" />
          <a-popconfirm title="确定要删除此用户吗?" @confirm="remove(record)">
            <a class="ele-text-danger">删除</a>
          </a-popconfirm>
        </a-space>
    </template>
</template>
② 在childinfo/components目录下添加一个组件:child-edit.vue, 这是一个表单,用于实现添加和编辑
<template>
  <a-modal
    :width="860"
    :visible="visible"
    :confirm-loading="loading"
    :title="isUpdate ? '修改儿童信息' : '添加儿童信息'"
    :body-style="{ paddingBottom: '8px' }"
    @update:visible="updateVisible"
    @ok="save"
  >
    <a-form
      :label-col="{ md: { span: 3 }, sm: { span: 24 } }"
      :wrapper-col="{ md: { span: 21 }, sm: { span: 24 } }"
    >
      <!-- 隐藏字段 -->
      <a-form-item v-show="false">
        <a-input v-model:value="form.id" />
      </a-form-item>
      <a-form-item label="儿童名称" v-bind="validateInfos.name">
        <a-input
          allow-clear
          placeholder="请输入儿童名称"
          v-model:value="form.name"
        />
      </a-form-item>
      <a-form-item label="性别" v-bind="validateInfos.sex">
        <sex-select v-model:value="form.sex" />
      </a-form-item>
      <a-form-item label="图片" v-bind="validateInfos.image">
        <a-input
          allow-clear
          placeholder="请上传图片"
          v-model:value="form.image"
          disabled
          style="width: 548px"
        />
        <a-upload :show-upload-list="false" :customRequest="onUpload">
          <a-button type="primary" class="ele-btn-icon">
            <template #icon>
              <upload-outlined />
            </template>
            <span>上传图片</span>
          </a-button>
        </a-upload>
      </a-form-item>
      <a-form-item label="年龄" v-bind="validateInfos.age">
        <a-input
          allow-clear
          placeholder="请输入年龄"
          v-model:value="form.age"
        />
      </a-form-item>
      <a-form-item label="性情" v-bind="validateInfos.temperament">
        <a-textarea
          :rows="3"
          placeholder="请输入性情"
          v-model:value="form.temperament"
        />
      </a-form-item>
      <a-form-item label="爱好" v-bind="validateInfos.hobby">
        <a-textarea
          :rows="3"
          placeholder="请输入爱好"
          v-model:value="form.hobby"
        />
      </a-form-item>
      <a-form-item label="发布日期">
        <a-date-picker
          class="ele-fluid"
          placeholder="请选择发布日期"
          v-model:value="publicDate"
        />
      </a-form-item>
      <a-form-item label="描述" v-bind="validateInfos.description">
        <a-textarea
          :rows="3"
          placeholder="请输入描述"
          v-model:value="form.description"
        />
      </a-form-item>
    </a-form>
  </a-modal>
</template>
<script lang="ts" setup>
  import { ref, reactive, watch } from 'vue';
  import { Form, message } from 'ant-design-vue';
  import { assignObject } from 'ele-admin-pro';
  import { addChild, updateChild, uploadFile } from '@/api/neirong/child';
  import type { Child } from '@/api/neirong/child/model';
  import SexSelect from './sex-select.vue';
  import { RuleObject } from 'ant-design-vue/es/form';
  import dayjs from 'dayjs';
  import type { Dayjs } from 'dayjs';

  const useForm = Form.useForm;
  const publicDate = ref<Dayjs>();

  const emit = defineEmits<{
    (e: 'done'): void;
    (e: 'update:visible', visible: boolean): void;
  }>();

  const props = defineProps<{
    // 弹窗是否打开
    visible: boolean;
    // 修改回显的数据
    data?: Child;
  }>();

  // 是否是修改
  const isUpdate = ref(false);

  // 提交状态
  const loading = ref(false);

  // 表单数据
  const form = reactive<Child>({
    id: undefined,
    name: '',
    sex: undefined,
    image: '',
    age: undefined,
    temperament: '',
    hobby: '',
    publicDate: '',
    description: '',
    createUser: '',
    createTime: ''
  });

  // 表单验证规则
  const rules = reactive({
    name: [
      {
        required: true,
        message: '请输入儿童名称',
        type: 'string',
        trigger: 'blur'
      }
    ],
    sex: [
      {
        required: true,
        message: '请选择性别',
        type: 'string',
        trigger: 'blur'
      }
    ],
    image: [
      {
        required: false,
        message: '请上传图片',
        type: 'string',
        trigger: 'blur'
      }
    ],
    age: [
      {
        required: true,
        type: 'string',
        trigger: 'blur',
        validator: (_rule: RuleObject, value: string) => {
          return new Promise<void>((resolve, reject) => {
            if (!value) {
              return reject('请输入年龄');
            }
            if (/^\d{1,2}$/.test(value)) {
              return resolve();
            }
            return reject('年龄不正确');
          });
        }
      }
    ],
    temperament: [
      {
        required: true,
        message: '请输入性情',
        type: 'string',
        trigger: 'blur'
      }
    ],
    hobby: [
      {
        required: true,
        message: '请输入爱好',
        type: 'string',
        trigger: 'blur'
      }
    ],
    description: [
      {
        required: false,
        message: '请输入描述',
        type: 'string',
        trigger: 'blur'
      }
    ]
  });

  const { resetFields, validate, validateInfos } = useForm(form, rules);

  /* 保存编辑 */
  const save = () => {
    validate()
      .then(() => {
        loading.value = true;
        const data = {
          ...form,
          publicDate: publicDate.value?.format('YYYY-MM-DD')
        };
        const saveOrUpdate = isUpdate.value ? updateChild : addChild;
        saveOrUpdate(data)
          .then((msg) => {
            loading.value = false;
            message.success(msg);
            updateVisible(false);
            emit('done');
          })
          .catch((e) => {
            loading.value = false;
            message.error(e.message);
          });
      })
      .catch(() => {});
  };

  /* 上传 */
  const onUpload = ({ file }) => {
    if (file.size / 1024 / 1024 > 100) {
      message.error('大小不能超过 100MB');
      return false;
    }
    uploadFile(file)
      .then((res) => {
        message.success('上传成功');
        form.image = res;
      })
      .catch((e) => {
        message.error(e.message);
      });
    return false;
  };

  /* 更新visible */
  const updateVisible = (value: boolean) => {
    emit('update:visible', value);
  };

  watch(
    () => props.visible,
    (visible) => {
      if (visible) {
        if (props.data) {
          assignObject(form, props.data);
          if (props.data.publicDate) {
            publicDate.value = dayjs(props.data.publicDate, 'YYYY-MM-DD');
          } else {
            publicDate.value = undefined;
          }
          isUpdate.value = true;
        } else {
          isUpdate.value = false;
        }
      } else {
        resetFields();
        publicDate.value = undefined;
      }
    }
  );
</script>
③ 在api接口中增加addChild, updateChild方法
/**
 * 添加
 */
export async function addChild(data: ChildInfo) {
  const res = await request.post<ApiResult<unknown>>('/system/child/', data);
  if (res.data.code === 0) {
    return res.data.message;
  }
  return Promise.reject(new Error(res.data.message));
}

/**
 * 修改
 */
export async function updateChild(data: ChildInfo) {
  const res = await request.put<ApiResult<unknown>>('/system/child/', data);
  if (res.data.code === 0) {
    return res.data.message;
  }
  return Promise.reject(new Error(res.data.message));
}
④ 点击添加和编辑按钮事件处理
<script type="ts" setup>
  // 是否显示编辑弹窗
  const showEdit = ref(false);
  /* 打开编辑弹窗 */
  const openEdit = (row?: ChildInfo) => {
    //current.value = row;
    showEdit.value = true;
  };
</script>